Halloween Mantle ~ How-to Tutorial
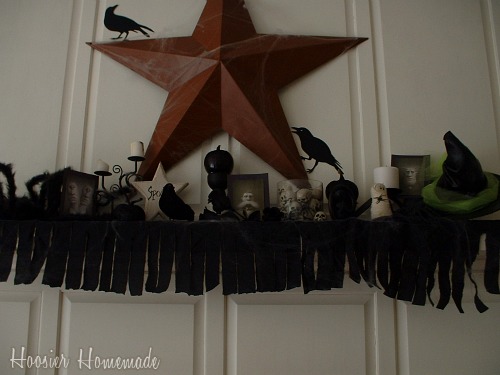
It’s that time of year again, when all the ghosts, goblins and all creepy things come out of the basement…this time, they landed on my Mantle!
When I was thinking about how I wanted to decorate our Halloween Mantle this year, I knew I wanted it a little creepy. The other holidays when I decorated the Mantle, I kept it pretty light and airy. It was time for a change.
After looking at several other Halloween decorations for inspiration, over at the All-Halloween Bash, I pulled several different ideas together, including the black and white theme that Leanne shared on her blog, Organize and Decorate Everything.
Unlike my Fall Mantle, where I didn’t spend any money, this Halloween Mantle did cost me a little to create. However, I spent around $10, and the only item that I won’t be able to keep for years to come, are the real pumpkins.
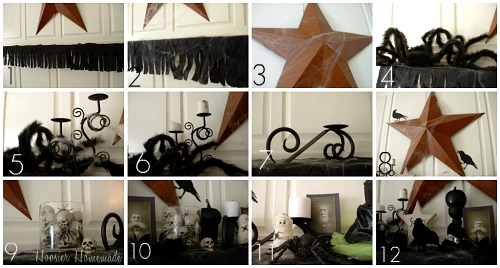
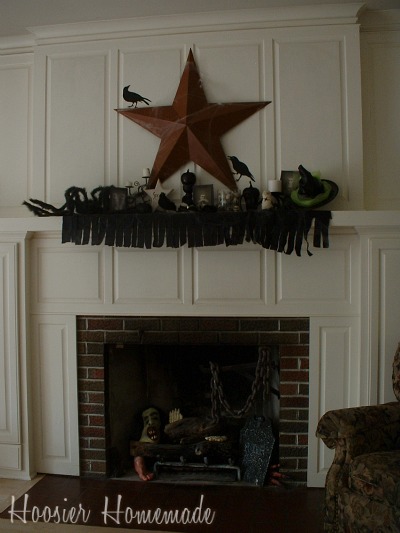
- I started with black fabric, tore the strips and then draped it over the edge, to use as a garland.
- Next came the spider webs
- And the star (that stays on the wall all the time) was dressed with spider webs too
- A large spider was added to one end of the Mantle
- And a Candle Holder that I bought for $1 at Goodwill, spray painted black, a few more spider webs
- Next I added some white votive candles, I burned them down a bit and dripped the wax down the side to look creepy
- A second Candle Holder that I also bought at Goodwill and sprayed black
- I simply taped a couple crows (thanks Martha) that I bought at Michael’s
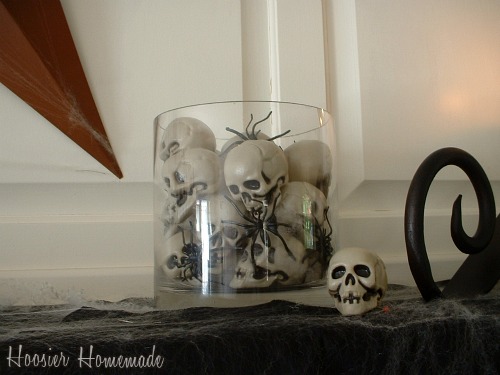
- The skulls also came from Michael’s, they were $2 for a bag, I used 2 bags, some spider webs and a few plastic spider rings that I cut the ring part off (I also saw these at The Dollar Tree, after I had already bought them) **See picture below for more detail
- I used a small black tin votive holder to place the pumpkin on. The pumpkins got a coat of black spray paint and a sprinkle of black glitter.
- Then the Witches Hat was added (see below for details on how to make the Hat) a stuffed Mummy and a plastic spider.
- To fill in the middle, I added a white wooden star that says Spooky, a candle holder turned upside down with another pumpkin, 3 black roses and a crow (the same crow I used in the Fall Mantle)
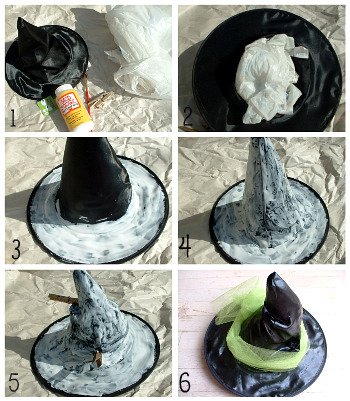
When I saw this Witches Hat at In This Small House blog, I was on the search to find a hat. After several stops, I found one at Target for $2.50, grabbed some Modge Podge (because of course the bottle I had was no where to be found) and some netting at the JoAnn’s Fabrics.
- You will need: a Witches Hat, Modge Podge, plastic bags, a paint brush (mine is kind of small, but once again, somehow things disappear in our house) and 2 clothes pins
- Stuff the hat with the bags
- Paint the brim with the Modge Podge
- And then the rest of the hat
- Scrunch the hat down and use the clothes pins to hold it in place
- Add some netting, tie a bow and use some straight pins to tack it down some (optional)
With the soon to be released new Harry Potter movie, you can look for this hat to be making it’s way onto the Harry Potter Dinner post as the Sorting Hat 🙂
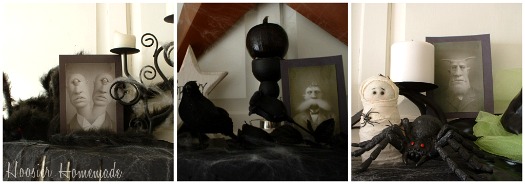
The photos of the creepy ghouls were found on the internet, printed off and simply glued to a square of black construction paper.
One of the Fall Hurricane Vases, got some new life…I layered the skulls, spider webs and plastic spider rings.
I couldn’t resist, I took it one step further and added a few body parts to the fireplace.
Is it creepy enough? Do you decorate for Halloween? Share your ideas with us!
I’m linking to the Blog Parties in my footer, please visit them! You might just find one or two that are new to you!

is the hat weather proof… Is it usable outside without falling apart? Does the mod podge solidify the hat for outside?
Hi Martha, I did not have the hat outside. I think it would depend on how bad the weather gets at your house.
-Liz
I absolutely love all your creative touches! Decorating the mantle for each season is always my favorite part of holiday decorating. My favorite part of all of your wonderful mantle creations and decor was the “family photos” of the ghouls!
Totally lovin’ this! I really like what you have inside the fire place too!
I love the birds and the witch’s hat. You did a terrific job with this, Liz!
Darling Mantel and such a fun tutorial, you have great ideas!
Linda
TERRORific mantel….I do love everything and anything Halloween.
My Show n Tell is my newest Witch for my collection.
The link is HERE I’d love to have you stop by for a visit.
Love the mantel! I really like the creepy ghoul pictures. I am having a Halloween party this year and have been looking for some creepy images. I love this idea! Thanks for the inspiration:)
I just have to have those creepy ghouls pic you have. Will you please tell me what website you got them from? Pretty Please…..
Sure…I’ll have my son find them and then let you know.
Gorgeous!
Spooky. I love the inside of the fireplace.
I love your mantel, especially the crows. Everything looks so great and the witches hat was a great touch. Thanks for mentioning my blog.