How to make a Family Flag
Many years ago, my Father-in-Law found our family crest, at that time he had some hats and shirts made, but beyond that, no one ever really did anything with the crest. So when Doug and I were planning what we wanted to share for Olympics Week, a flag was a must have since a large part of the Olympics is the parade of nations with the flags from each country being represented.
The question was, how could we make a flag that would represent our family, then the light bulb went off and I remembered the family crest. And the Family Flag was designed.
Now, I’ll have to say, this project was a little more challenging than some of the others. But after a little trial and error, we figured it all out. Let’s gather our supplies…

Family Flag Supplies:
- Drop cloth, canvas or heavy fabric {we used a drop cloth}
- Colored fabric {your choice}
- Heat n’ Bond fabric adhesive
- Letters {we used paper letters that we found at Walmart near the crayons and art supplies}
- Iron on Transfer Sheets {we used Print ‘n Press by Tailor}
- Family crest {we found the one my Father-in-law used by doing a simple Google search}
- Sewing machine
- Small sharp scissors
- Iron

Step 1:
- First you need to determine the size of flag, we used 2 foot long by 3 foot wide. Cut and hem the edges on the sewing machine or use fabric glue. Then you need to determine the width of the fabric, depending on how many colors. I cut 5 1/4 inches wide on the top and bottom colors and 5 1/2 inches on the middle. Just determine your width and add 1/4 inch for seam allowance. Sew the seams together, iron seam to darkest fabric. Place on the corner of the flag and trim to the edge.

Step 2:
- Apply Heat ‘n Bond to the back of the fabric triangle, according to directions on the package. Iron onto the flag.

Step 3:
- Now it’s time to prepare the crest. Find the picture you want to use, and according to the directions on the Print n’ Press package, print out onto the transfer sheet. We decided to use this particular kind, because it was specifically made for adhering to fabric.
- Remember! You need to reverse the photo so when you iron it on it will be right side out.
- Then using small sharp scissors, carefully cut out your crest {or other photo}, this took some time and was pretty tedious, but the results were well worth it.

Step 4:
- Now you can add your name, I used the Heat n’ Bond and simply ironed on the letters. You could also use stencils and paint.

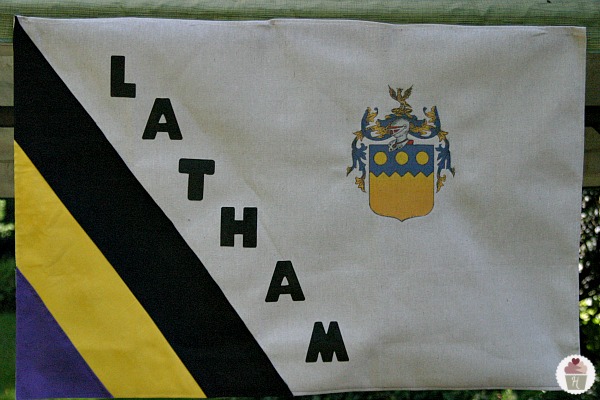
And you’re done…now you can attach a stick at one edge or hang it up like a banner.
Surprisingly well-designed! Just get rid of the letters, expand and simplify the Arms, and you’ve got yourself a respectable family flag, which is no easy feat. Fly it with pride.