Pinwheel Garland ~ How to Tutorial
This Pinwheel Garland was such fun to create! I can’t take credit for the idea though, Leanne, the Craft Queen from Organize and Decorate Everything came up with this cute idea! I first spied her Patriotic Garland when she linked up to my Fourth of July Party over at It’s A Blog Party. She has such great ideas, you NEED to check out her blog.
When I spotted the Pinwheel Garland, I already had all my Fourth of July decorating done. The wheels started turning, and I thought it would be fun to still do the Garland, but use bright colors for Summertime.
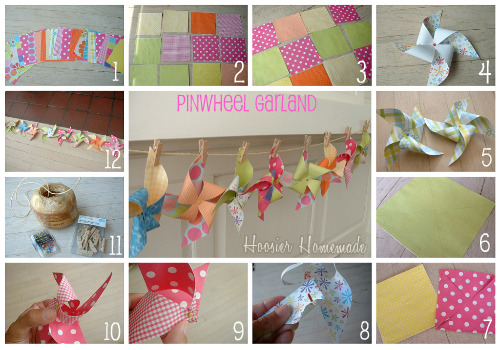
Here is how I created this fun little Pinwheel Garland…
- Cut squares of scrapbook paper, 4 1/2 inches x 4 1/2 inches
- Because my paper was not double sided, I glued 2 coordinating papers together, and laid them out to dry
- Then I trimmed the edges so there was no white showing
- This is how the Pinwheel looked with just white for the opposite side
- I did have 1 piece of paper that was printed on both sides, which made it a little quicker and easier to create the Pinwheel, but most of the paper I found at Hobby Lobby was not printed on both sides
- Then I connected each corner, drawing a line with a pencil
- Using a small pair of sharp scissors and a cutting board, I poked holes in each corner and the middle, you could also use a very small hole punch, like Leanne did, but I didn’t have one. Then cut along the lines, being sure to leave about 1/4 to 1/2 inch from the center point, not cut.
- Put a brad into one corner
- Feed all corners onto the brad
- And then thru the middle hole
- To assemble the Garland, I used twine and small clothespins that I found in the Office Supply department at Walmart, they were $1.88 for a box of 12. This picture also shows the brads that I found at Hobby Lobby, they were $3 for 100 and I used a 40% off coupon.
- Then I laid them out of the floor to make sure I liked the color combinations
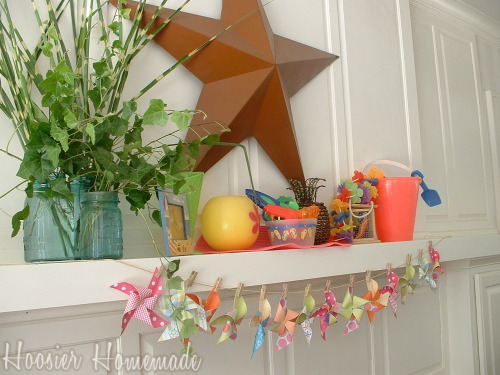
The ideas for these Pinwheels is endless. I used my Pinwheel Garland on my Summer Mantle.
I had such a fun time creating this Garland. And for less then $5, I think it makes a BIG statement.
I’m linking to Weekend Wrap-up Party, Saturday Night Special, Tutorials & Tips Tuesday, Mingle Monday


This is sweet and adorable and modern at the same time. I love the fact is hardly cost anything and has such impact!
Hey girl – this is too stinking cute! I shared a picture and your link on my Facebook page. I hope you don’t mind. Love the ideas – keep them coming!!!
@Southern Fried Gal, That’s awesome! Thanks so much!
~Liz
I love it! I’ve seen some great pinwheel crafts lately, I’m collecting them for a pinwheel party idea! https://imtopsyturvy.com/index.php/2010/05/flashback-friday-crochet-toys/
@Ashlee, I meant to say please come join my Topsy Turvy Tuesday’s link party tomorrow! https://imtopsyturvy.com
Very fun and summer-y! Love it!
This garland is too cute….so colorful..and I love that you included the instructions for making it….Thank you !!
This is A-DORABLE! Love it! Thanks for sharing!
Found you from Home is Where My Story Begins.
I think this would look super cute hanging in my daughters bedroom over her curtains! Love this!!! Found you on TidyMom, come see me if you get the chance!!
Love the colors! What a fresh idea for summer.
This is adorable. I have tons of great paper. This will be a fun project to do with my 15 year old daughter.
Becky K.
Hospitality Lane
What a darling garland. I want to make some of those little pinwheels immediately.
What an adorable idea!!
That is so cute! I think I’ll have to make up one to hang on the wall shelves behind my desk at work. I work for a pediatrician and like to make the office ‘fun.’ Wouldn’t the kids get a kick out of something like this?
@mom2fur, That’s a great idea!
Thanks for stopping by!
~Liz
Very cute! Great idea for a party!
Liz, your garland is adorable! I love all the colors you used!
Hi Liz, Thanks for mentioning me. You are so sweet. I love your summer pinwheels. The colors are beautiful and I love the polka dots. Your Summer mantel is so fun too. Have a great day. BTW, I was born and raised until age 14 in Indiana and my hubby’s name is Doug too. How Fun!
@Leanne, That’s crazy Leanne, we must be long lost sisters, at least crafting sisters. 🙂
Thanks for stopping by!
~Liz