How to Make Halloween Party Invitations
All this week we are sharing our tips for hosting a Halloween Party on a Budget. Several years ago I made a Boo Cone that you hang on a friend or neighbors door and they fill the cone and pass it along. I had planned on making those for the Halloween Party, and then it just kind of evolved into a Halloween Party Invitation.
Remember I told you on Monday about the awesome $.97 cent section at Walmart? All of these supplies came from there, with the exception of the cardstock which I found in the Office Supplies area.

Halloween Party Invitation Supplies:
- Cardstock in Candy Corn colors {we chose a muted set of colors, but whatever you like is fine}
- Scrapbook paper {Studio G in the Party Section has 6 sheets for $.97 cents}
- Chipboard stickers {again, Studio G in the Party Section}
- Ribbon {yep, you guessed it, in the Party Section}
- Double sided tape {in the office supply area}
- Glue spots or other adhesive material {I really like the Elmer’s Glue Spots, they are quick, easy and not messy}
- Paper cutter {not necessary but helpful}
- Dinner plate or other round object for a pattern
Let’s get started…

- Attach the cardstock together {long end} with double sided tape or other adhesive and place the plate in the middle and draw around it
- Cut out the circle
- Roll up the cone to get an idea of where to put the adhesive. Attach double sided tape
- Roll up the cone and secure ends
Next, you will need an invitation. I started with the Boo Cone from Skip To My Lou for inspiration, and changed the words to fit what we needed for an invite instead of the “Boo.”

Creating the invitation:
- Save the picture above {right click and save image}
- Then print it out on the gray cardstock that came in the pack with the other Candy Corn colors
- I printed 4 to a page, making them about 3 1/2 x 5 inches
- You could also type up your own invitation and just save to your computer and print it out

- Then after the invitations are printed, grab the scrapbook paper and cutter
- Trim around the invitation and then measure it
- Cut the scrapbook paper 1/2 inch larger than the invitation {on both sides} This will give you 1/4 inch of scrapbook paper showing all the way around the invitation. Attach the invitation to the scrapbook paper with glue spots
- Attach the invitation to the cone with glue spots
Time to add the embellishments…

- Add the chipboard sticker or other stickers that you like
- Punch a hole in the top of the cone and tie a ribbon to hang the cone with
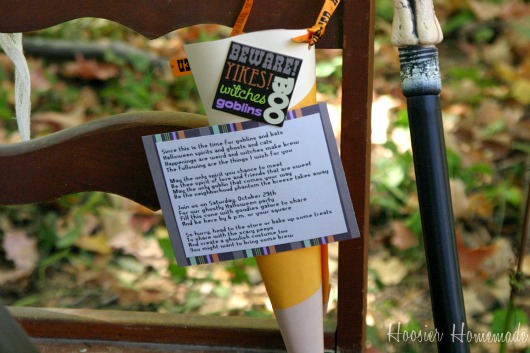
And then you are ready to deliver your invitations…

Have fun! Be sure to stop back on Friday and find out what else I used the $.97 cent goodies on…hint…

And in case you missed them…check out the fun Frankie Appetizers we shared over on Pocket Change Gourmet!

Linking to…Show & Tell Friday, Frugal Friday
Oh Goodness such adorable goodies ! Wish I still had little ones at home – they would have gone over big!
thanks for sharing !
gena