How to make Giant Tissue Paper Flowers
Decorating for Spring is something I look forward to all Winter! Even though I love Summer with the hot weather, somehow Spring always seems to renew how I feel. The house gets a good cleaning, the fresh air and the beautiful flowers begin to bloom.
After making the Tissue Paper Flowers last year, and loving how they turned out, I knew I wanted to use them as inspiration for the Spring Mantel. But they needed to be bigger and better than before.
It did take us some time to figure out how to make the Giant Tissue Paper Flowers, and they definitely are not a quick project. But the results are splendid…

And when I say Giant…they really are…

This tutorial will work for any size flower that you want to make, but ours stand about 8 foot tall, 7 foot tall and 4 foot tall.

Let’s gather our supplies…

Giant Tissue Paper Flowers Supplies
- Kraft Paper
- Chicken Wire – we bought this at our local Tractor Supply store, you could also find it at a home improvement store (or Amazon of course!)
- Wire – 20 gauge – found in the floral supply area
- Tissue Paper – any color is fine – you will need 2 packages of green only, then at least 10 sheets of colored for EACH flower
- Tape – regular scotch tape is fine, I have floral tape in the photo, but found it didn’t work well
- Ready to use Concrete Mix– found at a home improvement store
- Glue – any kind
- Mod Podge – not shown
- Sponge paint brush – not shown
- Plastic cups
- Spanish Moss – for the inside of the flowers, available in the floral supply area

First you will need to make the bases so that the concrete can set up, it will take at least 24 hours to set.
How to make Concrete Bases
- Ready to use Concrete Mix
- 1/2 cup water – we colored it purple just so you could see the water more clearly
- Plastic Cups
Instructions
- Fill the cup with concrete
- Slowly pour in water, carefully stir with a popsicle stick or wooden skewer and level with stick
- Gently squeeze the sides of cup to help blend together
- Let set 24 hours until completely hard

Next you will need to form the stems. Again, any size will work.
How to make Giant Flower Stems
- Chicken Wire
- Wire cutters
- Heavy gloves
- Plastic Cups – empty
- Craft Paper
- Green Tissue Paper
- Mod Podge – we used a matte finish
- Large sponge brush
Instructions
- When working with the chicken wire, it’s best to wear heavy gloves.
- Roll out the chicken wire, cut 1 foot wide by the length you want the stem
- Form around the plastic cup for the base and roll into a cyclinder
- Cover completely with craft paper, tape if necessary
- Thin the Mod Podge with a little water, wrap the stem with green tissue paper, securing with Mod Podge on ends
- After the entire stem is covered with tissue paper, coat it with Mod Podge, this helps secure any loose ends and makes the stem look uniform in color.
- Let dry several hours

Now the leaves…
How to make Tissue Paper Leaves
- Green tissue – same colors or 2 different is fine, cut into 12 x 14 inches
- 20 gauge wire – 4 pieces
- Mod Podge
- Sponge Brush
Instructions
- Form the wire by twisting 2 pieces together, and add the cross pieces and continue to twist
- Spread a thin layer of Mod Podge, watered down a bit, onto 1 layer of tissue
- Lay down the wire, making sure to leave a few inches of wire showing on the bottom and then cover with another piece of tissue
- Let dry about 30 minutes
- Cut out leaf leaving a few inches of wire out on the bottom
Note – we found it easier to glue the pieces together then cut the leaf, so that you don’t have to try to match up the edges

Now it’s time to make the flowers.
How to make Giant Tissue Paper Flowers
- Tissue Paper – cut into 3 sizes, 4 pieces each of small and medium, and 8 pieces of large size – just cut them freehand is fine
- Tape – after taking this photo, I found that regular scotch tape worked better than floral tape
- Yellow Tissue Paper for the centers – cut 4 circles {I used a cereal bowl for a template}
- Spanish Moss
- Glue

Begin with the smallest petals, pinch the bottom together and then tape.

Continue to add the petals, by pinching the bottom together

And tape around the bottom.

After the flower is complete, with all the petals added, now it’s time to make the centers.
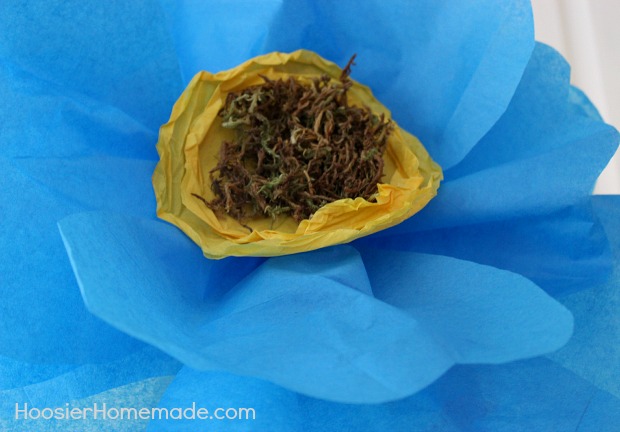
How to make Giant Tissue Paper Flower Centers
- Working with 2 of the tissue paper circles, pinch around the edge forming a groove
- Repeat with the other 2 pieces, but make them a little smaller by pinching a little more tissue paper
- Glue together the 2 sets and then glue a small handful of Spanish Moss on

Then glue the center into the flower, and form the petals.
Important Notes on the Tissue Paper Flowers
- These flowers are different than the ones I made last year.
- I think both flowers turned out well, however, next time I think I will go back to my other way of making them, but still add the centers.
- I liked that they were a little fuller last year.
- Both tissue paper flowers take LOTS of patience, so take your time.
- Don’t get too discouraged, the flowers seem to take on a life of their own and kind of flow in a certain direction, in the end, they turn out fine.

We have the stems, leaves and flowers…now let’s put them all together.
How to create the Giant Tissue Paper Flowers
- Turn the concrete filled cup upside down and place the stem on top
- Using a zip tie, attach the flower to the top
- Carefully poke the wire from the bottom of the leaf into the stem {you may need to secure the leaves to the stem with a dot of glue}
These Giant Tissue Paper Flowers will become part of my Spring Mantel soon, but I think they would also be great for a shower, in a nursery or little girl’s room, or even a garden party.
So tell me…do you love them? Be sure to let me know when you make them and feel free to share a picture on my Facebook page!
These are fabulous!
Thanks so much Meg!
-Liz
In reply to the previous comment, I found another tutorial that might be helpful where you spread the petals out, tape them flat in a row and then roll then like a fan. You pinch the bottom and secure with tape. You continue this, spread out, place the previous roll in the corner of the next line of petals you’ve taped and roll up the line of taped petals. Then secure the newly rolled petals with tape at the bottom. Each time making sure to punch out the center so to speak so you can add the yellow center and moss at the end. Continue this through the layers. She had a lot of large layers. It was zip tied at the end to the large stems. She used the stucco corner but it looks to be difficult to find. I’m going to attempt the chicken wire method with a larger cup. I love the modge Podge idea on here.
Really love the idea. I would like to try for my fairy stage decorations. I will upload the result for you to see. Thank you very much dear
Hi,
I also did what Letty did—I had tried chicken wire and it did not hold up, even without the flower on it. We bought 20 gauge chicken wire (there are different gauges). So to make it work, we turned the cups right side up and put dowels inside the concrete to give a base. That helped, but still did not stand on their own once we got past 5′ tall. (that is way before craft paper/masking tape and a flower on top) We also created a cross base made out of paint sticks for the taller ones, since I was making about 50, I needed them to be upright! ( I hated the idea of having to do this but needed to make the cups work that I had poured already) The original directions I found said to use “stucco corner” which is definitely higher gauge and sturdier, but is much harder to cut and work with, not to mention find–in our area.
Also, I have found the taping process for the flowers to be quite cumbersome and didn’t really stay together once you had all the different layers on there. I feel like there is a better way to do it, but haven’t figured out what that is. Do you have any other steps that aren’t on your site? I just feel like something is missing for those flowers to be standing up right with just chicken wire. Did you use Papier Mache to secure the paper? That is the only thing I thought would create the rigidity needed around the chicken wire.
Not trying to over analyze your directions! Just really want a good way to complete this obviously cute project!
I tried chicken wire and it won’t hold up at all! Is there a specific size or kind you use. It just goes limp and falls. i bought a huge roll of it and tried everything. Help! took this project on and only a few days to complete and totally stuck.
Thanks!!
Letty
Hi Letty, sorry you are having trouble. To our understanding, there is not different gauges of chicken wire. Is your stem falling after it’s attached to the concrete base cup and wrapped?
~Liz
Thanks you so much for this tutorial! It is easy to follow and I will be using your directions to make flowers for my daughter’s birthday party!
Thank you so much for this tutorial. I love these flowers and I’m thinking of using them for my bridesmaids in lieu of a bouquet. They will double as decor at the reception!!! How much would you estimate each flower costs in the end? Also, is there a better place to buy tissue paper? Thank you!
Hi Ashley, each flower is approximately the cost of 1 package of tissue, I think they are around $2 at Walmart. The only other thing you will need is wire, which typically is about $4-$5 for a whole ball.
If you want a special color, you might try online, otherwise Walmart is probably going to be the cheapest.
Hope that helps! Happy Wedding to you!
how super cute I love these
come see what I shared at https://shopannies.blogspot.com
Wow, these are fabulous! What a fun project 🙂
Thanks for stopping by Leisa! So excited you like the flowers!
I never used to be a big fan of spring, but as I’ve got older I’ve started to appreciate the springtime – especially since winters seem to last forever!
These are stunning – really pretty! I’ve pinned this onto my Spring board on Pinterest and would love for you to come share this at my Link party at The Purple Pumpkin Blog. Hope to see you there!
Have a great weekend, Michelle xx
These are awesome!
Thanks Melissa! I’m so excited you like the flowers!