How to make a Raised Garden Bed
Last week we shared the Raised Garden Bed Cover with you, and didn’t want the time to slip away before we shared how to make the Raised Garden Bed.
Click here for your FREE garden and landscape journal- the first step to gardening success!
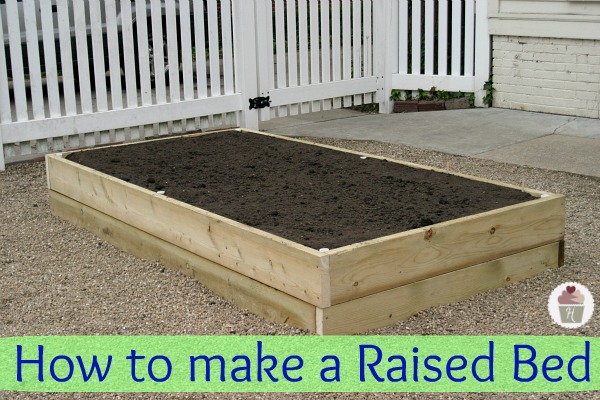
There are many reasons to garden using raised beds… poor soil conditions, lack of space, drainage issues and weather conditions are a few of the problems that can be addressed. Our reasons are a combination of all of these. Let me give you a little overview of our site. Do you see all the pea gravel in the picture below? Well we didn’t bring that into our backyard, the previous owners had an above ground pool and apparently thought that the best option was to spread 6 inches of pea gravel over the entire yard… yeah, you gotta love that.
So after looking at our options we decided that removing and replacing the pea gravel with topsoil was just too costly and decided on some raised beds. We’ll also be able to extend our growing season, soil tends to warm up faster in raised beds and we can speed the process along by using the bed cover.

Let’s get started…
Raised Garden Bed Supplies:
- Four 2″x8″ 8 foot in length
- Four 2″x8″ 4 foot in length
- Four 24 inch Stakes
- 16d (3 1/2″) galvanized decking nails
- Landscaping fabric or plastic to line the interior
- Claw hammer, level, framing square

Mark out your area, keep in mind that you want to place your garden in the area of you property that gets the most sun. Also every piece of information you will find on garden suggests to orient them in a North-South direction, not to be one that bucks the system I went ahead and laid out this bed following those guidelines. This bed is only 8 feet long by 4 feet wide so I probably didn’t need to though but you can do as you like.

Remove any weeds or sod (one step we didn’t need to do) in the area that you are going to place your bed and dig a 2 to 3 inch deep trench for the framework to rest in.

I used 16d galvanized decking nails and lap jointed the ends to assemble the frames, this is a simple yet sturdy joint that doesn’t need special tools. To make it stronger you can glue the joints (use glue made for exterior use) and use galvanized deck screws.

After assembling the bottom framework and placing into the trench…

Drive in the stakes to secure it into place, this will also help prevent the framework from heaving due to frost in the winter.

Rake the stones to a rough grade, they don’t need to be perfectly level but you will want to fill in the trench to provide support to the frame.

Make sure that each section is level…

Add second level of the frame, leveling and securing to the support stakes. We added two levels because we wanted the soil to be at least 12 inches in depth. If you have good soil with no drainage issues you could easily get by with one level.

After the plastic is stapled in and the pipes are screwed in for the Bed Cover…in comes the soil, we first added a blend of topsoil and sand (3:1) 6 to 8 inches deep, then followed up with a layer of compost.

Then it was time to plant…
Here’s a little update and some more plants that went in

After only 5 short days…we have Chinese Cabbage sprouting through

Doug planted lettuce

And the first of the Zucchini plants went into the ground…I can hardly wait for Zucchini Bread

Project Notes:
- We used lumber lined with plastic to keep costs down, other types of wood recommended are cedar and redwood but these would have quadrupled our lumber costs. Just be sure to stay away from wood that is treated with creosote.
- If you don’t have a saw at home you can have the boards cut for you where you purchase it.
Linking to…Sundae Scoop
Love your ideas. Thanks for sharing.
I love raised gardens! I too live in suburbia and the only way to improve my soil conditions is to raise the garden on up.
One thing I’ve done slightly different this year, is arrange my garden in a permaculture pattern. I have an 8×4 garden space and a friend of mine (permaculture expert), helped me plan my layout for this year’s summer season. I’m really excited to see how things turnout, but if all goes according to plan I was able to fit about 20% more veggies in the space thanks to prior planning.
Thanks for the great tutorial!
Great tutorial! We have raised beds, too! Here is my Sundae Scoop link: https://likemamalikedaughter.blogspot.com/2012/05/how-to-tuesday-cottontail-cape.html
I love this! Great job.
So glad you like it, Betsy! Thanks for stopping by!
~Liz
Love this – we have a decent sized garden that we blog about. But just recently we put in some planter boxes around our deck. Super easy project and basically made raised beds – but I put flowers in mine instead.
https://sistersplayinghouse.blogspot.com/2012/05/planterboxes-for-our-deck.html
I have a tiny yard. Every year I put in two tomato plants that grow like crazy. I’d love to try your raised bed garden. Maybe I will.
We are Hoosiers too that now live in suburbia and put in a raised garden (square foot garden) last year. I found a 4×12 frame kit at Menard’s for not much more than the cost of the lumber. Hubby was skeptical, but put it together for me and helped me mix the soil as outlined in Mel Bartholmew’s book. We planted 12 tomato plants, peppers, onions, basil. We had enough produce that I was able to make (can) enough spaghetti sauce, salsa, and tomato sauce to last until this year’s harvest! Hubby is now such a believer that he put the grid back on the garden 3 weeks ago without being asked. He is a believer, and that is saying a lot for a Hoosier farm boy that thought the only way to garden included a rototiller or preferably a John Deere.
Thank you for sharing this! I’ve been thinking about making one for my garden. 🙂
-Courtney P.
http://www.optimisticmommy.com
http://www.peaceloverecipes.com
I so want….and need a raised bed…or 2 or 3.
We keep talking about it. We bought this house March 2011 and immediately put in a garden. We soon found just how bad the soil is.
We planted again this year….just yesterday. I had tried to compost with no luck last year. We bought a big bag of Miracle Grow and have put it in with the seeds and plants. We are just praying it helps.
Other things are the rabbits in the yard….and our own dog who keeps insisting on digging in the garden.
So I need raised beds, but also fencing…and fencing that a rabbit can’t get through.
Marsha