Dragon Cupcakes: Chinese New Year
Welcome to Cupcake Tuesday! I’m so glad to have you! I have updated the Cupcake Heaven page, there are over 150 designs and recipes!
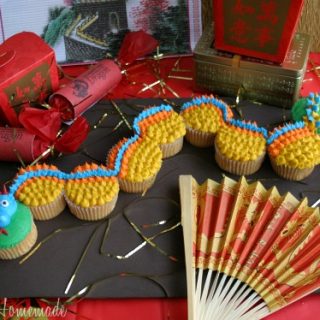
Over the weekend, Doug and I put together a fun Chinese New Year Celebration for you. Most of the week, we will be sharing the recipes, decorating and crafts we made. We also have a giveaway on Thursday, so stay tuned for that!
These Dragon Cupcakes were the perfect addition to the Chinese New Year Celebration. They would also be great for a dragon lovin’ kiddo’s birthday party. I used bright colors, but you could certainly change the colors to fit the birthday theme.


He looks difficult, but after you break it down, it’s very easy. Let me show you…

Dragon Cupcake Tail
- Frost cupcake with green icing and smooth
- Using the bag fitted with #10 Tip and yellow frosting, pipe on tail
- At the base of the tail {where it meets the body} add a few more dots to make it a little thicker
- Pipe on the “spikes” with the #352 leaf tip and blue frosting

Dragon Cupcake Body
- Add a #10 tip to the decorator bag with orange frosting
- Pipe on small dots, 2-3 rows on one side of each cupcake, making sure that you are connecting the rows
- Add a #10 tip to the decorator bag with yellow frosting
- Pipe on the remainder of the cupcake
- Add a #352 leaf tip to the decorator bag with blue frosting
- Add “spikes” to the top of one row of orange

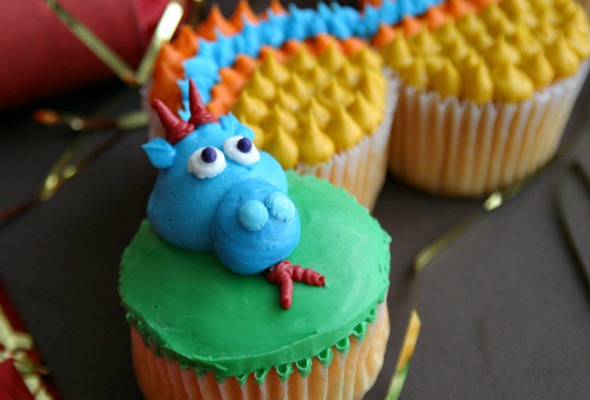
Dragon Cupcake Head
- Frost cupcake with green icing and smooth
- Fit a decorator bag with a giant round tip and fill with blue icing
- Pipe on a large circle for the head
- Change blue frosting bag to a #12 tip, pipe on snout
- Add the nostrils with a #3 Tip, I used a lighter shade of blue for the nostrils
- Add a #3 Tip to the bag with red frosting
- Pipe on the horns and tongue
- Add #352 Leaf Tip to the blue frosting and add the ears
- Add a #3 Tip to the bag with white frosting
- Pipe on the eyes and add a couple jumbo sprinkles or other candy
Dragon Cupcakes
Make these fun Dragon Cupcakes from HoosierHomemade.com to celebrate the Chinese New Year!
Ingredients
- 8 {or more} regular size cupcakes – I used Orange Flavor Cupcakes {recipe from Cupcake Chronicles Newsletter }
- Decorator Icing or your favorite frosting
- Decorator Tips Giant Round, #12 {round}, #10 {round}, #3 {small round}, #352 {leaf}
- Decorator bags and couplers
- Coloring – Sky blue, No-Taste Red, Orange, Buttercup Yellow, Leaf Green
- 2 dark colored jumbo sprinkles for the eyes
Instructions
- Color icing and fill bags
- Place cupcakes together to form dragon
Dragon Body
- Add a #10 tip to the decorator bag with orange frosting
- Pipe on small dots, 2-3 rows on one side of each cupcake, making sure that you are connecting the rows
- Add a #10 tip to the decorator bag with yellow frosting
- Pipe on the remainder of the cupcake
- Add a #352 leaf tip to the decorator bag with blue frosting
- Add “spikes” to the top of one row of orange
Dragon Tail
- Frost cupcake with green icing and smooth
- Using the bag fitted with #10 Tip and yellow frosting, pipe on tail
- At the base of the tail {where it meets the body} add a few more dots to make it a little thicker
- Pipe on the “spikes” with the #352 leaf tip and blue frosting
Dragon Head
- Frost cupcake with green icing and smooth
- Fit a decorator bag with a giant round tip and fill with blue icing
- Pipe on a large circle for the head
- Change blue frosting bag to a #12 tip, pipe on snout
- Add the nostrils with a #3 Tip, I used a lighter shade of blue for the nostrils
- Add a #3 Tip to the bag with red frosting
- Pipe on the horns and tongue
- Add #352 Leaf Tip to the blue frosting and add the ears
- Add a #3 Tip to the bag with white frosting
- Pipe on the eyes and add a couple jumbo sprinkles or other candy

We kicked off the Chinese New Year Celebration with Orange Mango Chicken yesterday. It has amazing flavor, and is a quick and easy meal for anytime, not just for the Chinese New Year.
Can you send me the info on how to make the Stilletto heels…..I can’t seem to get to that page…..
These are beautiful! Thank you so much for this idea. It inspired me to make dragon cupcakes for the holiday which I shared on my blog today: https://www.littlemspiggys.com/2012/01/chinese-new-year-and-dragon-cupcakes.html
I found this photo via your Flickr photos….I LOVE IT SO MUCH….it is super cute and so original!!! Awesome job!!! Btw LOVE the stiletto cupcakes as well!
That dragon is just too cute for words! We will be having our Chinese New Year celebration on Monday!
Thanks Jenn! I’m working on the post for tomorrow with the rest of the recipes and ideas. Stay tuned…
~Liz
That dragon is just the coolest! Love it! I would also love if you would stop by and share it tomorrow at Mrs Foxs Sweet Party! Happy Cupcake Tuesday!
love the dragon! great job L!