How to make a Pinwheel
Pinwheels are not only the most adorable little decoration, they are super easy to make and a very frugal craft also! I’ve had some questions lately about how to make them, and although I shared a tutorial last year, the pictures weren’t the best. So I thought it would be helpful to show you again, and I also created a short video to show you how to make a Pinwheel.

Supplies you will need to make a Pinwheel:
- Scrapbook Paper
- Spray adhesive – if your paper is not double sided
- Paper cutter
- Ruler or straight edge
- Pencil
- Scisscors
- Metal brads – either colored or gold


Step 1:
If the scrapbook paper is not double sided, use the spray adhesive {or glue} to attach two pieces of paper together. {you can also use single sided but I like the pinwheels to have a pattern on both sides} Let them set 5-10 minutes to dry. Using a paper cutter, cut out squares, size will depend on how big you want the pinwheel. I usually cut 4 1/2 or 5 1/2 inch squares.

Step 2:
Draw a line, diagonally from corner to corner, creating 4 sections

Step 3:
Cut along the lines, stopping about 1/4 inch from the center mark.

Step 4:
Using small sharp scissors or a small hole punch, and working on a cutting board, make a hole in each section in the right corner. And also a hole in the center.

Step 5:
Push the metal brad through each hole and then through the center

Step 6:
Open the points on the brad to secure
Watch how easy the Pinwheels are to make…
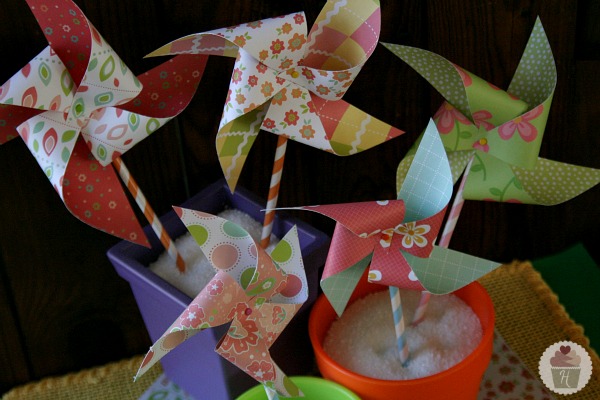
For a cute Spring display, I attached these Pinwheels onto a striped straw that I bought from Pick Your Plum. I also love to decorate with a Pinwheel Garland.

And on the Baker’s Rack…

And we even added some to the tops of Cupcakes!

Have you made Pinwheels? How did you use them? Decorations? Craft?
Check out my Pinwheel Pinterest Board for more inspiration!

Linking to…Transformation Thursday, Show & Tell Friday, Weekend Wrap-Up Party, Saturday Night Special, Sundae Scoop, Saturday Sevens, Get Your Craft On, Tip Me Tuesday
Thanks for the tutorial! How did you attach the pinwheels to the straw?
Hi Allison, yes you can attach the pinwheels to a straw with tape or glue dots. You can also use them as a banner on string or ribbon.
~Liz
This is a really good tutorial! I followed it this summer and featured these pinwheels in a post in which I linked this tutorial. Thanks so much!
Thanks so much for the article. I’m having a carnival wedding and it’s soo much easier than i thought to make them yourself. My fiance and I will be making a TON of these. Thanks again!!
These are so cute! Love the paper you choose.
I especially love the pinwheels on the cupcakes! Great tutorial. We will be making these soon! I found you on Tip Junkie and I’m following you on Pinterest now 🙂
I was planning on doing something with pinwheels for spring. I love the little clothespins holding them on to make a banner! Thanks so much for the tutorial!
I llove this. Thanks for sharing but how do you attach the finished pinwheel to the straw?
You can attach the pinwheel with tape or glue. Have fun!
I love them!! Pinwheels are so colorful and playful – so “spring”!
I gotta make some! Thanks for the tutorial.
Thanks for stopping by Christina! The Pinwheels are really fun to make!
~Liz
OMG thank you for this tutorial!!! I am so excited to give this a try! I found you on Tater Tots and Jello. I’d love to have you link up with us for Fun Stuff Fridays linky party at Toys In The Dryer. https://www.toysinthedryer.com/2012/03/fun-stuff-fridays-13.html
I love pinwheels. I love that you have a whole pinwheel board on pinterest. and I love the garland with them hung by clothes pins. Pinning This!
Thanks so much Laura! I love decorating with them too!
~Liz
Great tutorial! Pinwheels are so fun! Springtime is a great time to craft, it snowed here yesterday, even tho I bought seeds! Oh well…..on to pinwheels! Thanks!
Thanks Terri! This weather sure has been crazy this year, we are looking forward to Spring too!
~Liz
Ooo – I have wanted to this. Thanks for the fabulous tutorial. I’m pinning it.