Bunny Door Decoration
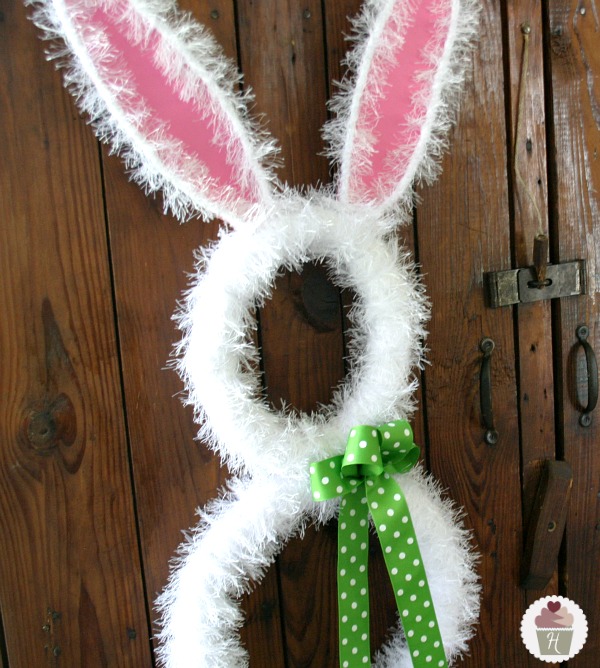
Hippity Hoppity…Easter’s on it’s way! Have you pulled out the baskets, plastic eggs and decorations? You might just want to add this Bunny Door Decoration to your crafting list! Mr. Bunny is SUPER cute and easy enough that your kiddos could help you make him.
You all know my love for Pinterest. While browsing around, I saw several variations of the Bunny Door Decoration. I knew I wanted to create something similar and put my own spin on it. I had a vision in my head of what I wanted, and I think Mr. Bunny turned out pretty cute…

So what do you think?? Isn’t he {or she} cute?
Let’s gather the supplies…

We found everything we needed at Walmart. We looked first for a wreath, and couldn’t find the size we wanted, so we headed on over to the Hardware Department and found the Foam Pipe Cover, it was on clearance for $2.50 which made the price perfect, and we could make the size we needed. Even though we didn’t plan it, the foam was perfect for adding the bunny ears.
The yarn, Lion Brand Fun Fur, was the perfect texture for the bunny. We bought 5 skeins, not knowing how much we would need for sure, I opened 3 skeins to have enough thickness and ended up using only about 2/3 of each.
Bunny Door Decoration Supplies:
- Foam Pipe Cover
- Duct Tape {or other heavy tape to hold the ends together}
- Lion Brand Fun Fur, white – 3 skiens
- Vinyl Coated Wire
- Ribbon
- White fabric for wrapping the wreath
- Pink paper for ears

- Remove the yellow tape from the center of the foam pipe cover, to expose the adhesive and seal together firmly. Form a circle and secure with Duct Tape. You will need 2 circles, the body is a full length of pipe cover – it made a 12 inch circle. For the second circle using a sharp knife, cut off about 10 inches of the length, form a circle and secure with Duct Tape – it made a 8 inch circle.
- Tear strips of fabric {you could also use white crepe paper} Wrap circle until covered completely.
- Using 3 skeins of Fun Fur, wrap the circle. Tie off with a knot.
- Draw an ear shape onto the pink paper and form the vinyl coated wire to fit. You could also use regular wire, but we found the vinyl coated wire was easier to bend and hold it’s shape

- Wrap the ears with white fabric and then Fun Fur, using the same method as for the circles. Using a hot glue gun {or strong glue} attach the wire to the paper so that the pink shows through the ear.
- Using sharp scissors, poke a whole through the fabric into the foam, and carefully push the ear into the foam.
- Secure the 2 circles together with a cable tie or heavy wire
- Cover the tie with a few strands of Fun Fur
Add the bow and you have Mr. Fuzzy Bunny done!

Mr. Bunny did take a little time {about 2 hours}, but all the steps are simple and the supplies are very easy to find. I think using the Foam Pipe Cover, was perfect! It went together really easily, and the price couldn’t be beat! I might just have to go back and grab a few more packages for future projects.
Have you ever used something unusual for a totally different purpose? Share your ideas with us!
![]()
Disclosure: This post is part of a campaign I am participating in with the Walmart Moms. Walmart has provided me with compensation and product for this post. My participation is voluntary and opinions, as always are my own.
Linking to…Sundae Scoop
I love this bunny!
Navy Wifey Peters @ Submarine Sunday
http://www.usscrafty.blogspot.com/2013/03/submarine-sunday-24.html
Liz, this is so adorable! I’ve been meaning to try some sort of front door decor with that pipe stuff. I love the fuzzy on this…it is too stinkin’ cute! Would be delighted for you to share this with us at Mop It Up Mondays (going on all week): http://www.ishouldbemoppingthefloor.com/2012/04/mop-it-up-mondays-10.html
{HUGS},
kristi
Love this!! Just whipped it together yesterday and am posting in my blog!! I am sharing your link to show where I got my inspiration!!!! THanks!!!!!
Christie
Looking forward to seeing it Christie! Be sure to post a link on my Facebook page, or here if you would like me to add it to Facebook.
I’ll pin it too 🙂
Hi – am new to this blogging thing so not sure how to add to your facebook page 🙁 The link to my post is below though!!
Thanks!!
http://216grant.blogspot.com/2012/04/craft-easter-bunny-door-hanger.html#links
I shared it on Facebook. Mr. Bunny is adorable!
~Liz
I love this. I sorta made one tonight, didnt turn out as good as yours, but I would like to put a link on my blog to let people see where I got my inspiration from. Would that be ok?
Im just barely starting my blog so not a lot of followers…yet. So if you would rather me not I completely understand!
Thanks for sharing,
Melissa
Hi Melissa,
Sure, I’d be happy to have you put a link. And be sure to share on my Facebook page too, so my readers can see it.
~Liz
Hey Liz!
Thanks for letting me use your link. I cannot get it to post to your Facebook page tho..,its on mine if you can get it to post to yours but it keeps telling me theres no recipient when I enter your timeline to share. i dont know its late and maybe Im just having a brain fart or something.
It didnt turn out as cute as yours. I’ll have to get some of that fun fur for next time. Such a cute idea tho!
Thanks so much for posting it!
Melissa
Hi Melissa,
Can you sent a link to your post? I’m not seeing it on the blog listed in your signature.
~Liz
THIS is so cheerful and fun and I absolutely love it! Brilliant to use that fuzzy yarn!! I’ve seen some bunny wreaths on Pinterest and thought they were delightful. I really love yours : ) I’m pinning this to my project to-do list!
I hope you will share this starting tonight at The CSI Project, The challenge is Spring Vignettes and Decor. That includes Easter. It will be a great party!!! Lots of inspiration.
http://www.thecsiproject.com
hugs,
Dee, the CSI Girl
This is absolutely adorable! I was just thinking that I needed something Easter-like to hang on the front door. It looks super simple to make!
Thanks so much Heather! Mr. Bunny is really fun!
Happy Spring!
~Liz
Sooooo cute love it!
Thanks so much Lachelle! Happy Spring!
~Liz
Oh my, take a bow!
You’ve put a “spring” in my step with your creative loveliness.
Have a blessed day!
Very cute, love the green bow!