Spring Flower Cupcakes

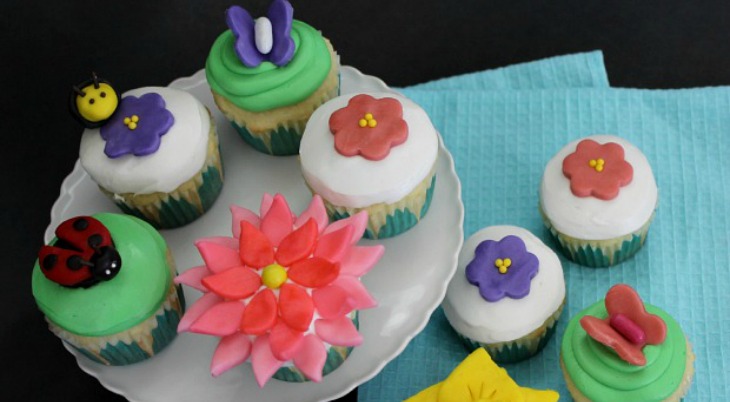
After our long Winter, we are all looking forward to the Spring Flowers, Grass, Trees, Warm Weather and yes even the Bugs. These Spring Flower Cupcakes are a celebration of what Spring has to offer. The flowers, lady bug and bumblebee are made with Candy Clay, a fondant like product that is easy to make, work with and taste really good.
Happy Cupcake Tuesday! I’m so excited you are here! Looking for a cupcake recipe? Be sure to check out the Cupcake Heaven page, there are over 300 cupcake recipes and decorating ideas!
I first learned how to make and use Candy Clay in the Cupcakes, Cookies and Pies. oh My! Book. With just 2 ingredients, it’s very easy to make and work with, but it does require some time so be sure to plan ahead. You can work with Candy Clay just like fondant, but the best part…it taste good!
You can watch the video on How to Make Candy Clay and grab the recipe. Let’s start with the Daffodil…
Daffodil Supplies
- Yellow Candy Clay
- Small heart cookie cutter
- Small flower cookie cutter
- Marker or pen to mold the center around
- Candy for the center – I used Sixlets
- Toothpick
How to make the Daffodil
- Roll out Candy Clay with a rolling pin or your hand. Cut out 5 hearts and 1 flower for each Daffodil. Allow the cut clay to rest about 10 minutes.
- Lay the hearts in a circle, overlapping. Mold the flower cut out around the tip of the marker and let rest for about 5 minutes.
- Place the center on top of the heart cut out
- Add the candy center and use the toothpick to make the indentations around the petals
Dahlia Flower Supplies
- Candy Clay in 3 shades – I used Wilton pink coloring and added a little more into each piece
- Tiny leaf cookie cutter
- Candy for center
How to make Dahlia Flower
- Roll out Candy Clay with rolling pin or your hand. Cut out leaves. I used 5-6 of the darkest shade, 6 of the middle shade and 12 of the lightest shade.
- Lay out the leaves and let them rest for about 10 minutes
- Slightly curl up the pointed end with your fingers and place on the cupcake. Add the candy for the center.
Lady Bug Supplies
- Black and Red Candy Clay – for each of these I recommend using the colored candy melts instead of white and adding coloring, it just takes too much coloring to get these dark colors
- Round cookie cutter – I used the inside of a doughnut cutter
- Chocolate and white Jimmie Sprinkles
- Sharp knife
- Tweezers
How to make the Lady Bug
- Roll out Candy Clay with a rolling pin or your hand. Cut 1 circle of each color for each lady bug. Allow the clay to rest for about 10 minutes
- Lay the circles out and roll a small ball of black for the head
- Using the knife, cut the red circle in half about 7/8 down the center. Roll tiny balls of black clay and add to the red for the dots.
- Place the red on top of the black circle so that the wings are separated a bit
Now add the head to the body and carefully add the chocolate sprinkles on top and the white sprinkles for the eyes. Use tweezers if necessary.
Bumble Bee Supplies
- Yellow and Black Candy Clay
- Chocolate Jimmie Sprinkles
How to make the Bumble Bee
- Roll the yellow clay into an oblong shape for the body. Then roll 2 tiny pieces of the black clay into ropes.
- Lay the ropes on the body and secure on the bottom by gently pressing them into the body
- Add the sprinkles on top and for the eyes
Candy Clay Tips:
- Make a batch of white, then divide for coloring. A little goes a long way with this clay.
- After coloring the clay, let it rest for about 10 minutes, it’s easier to handle.
- Store in an airtight container for up to a month. We use our Food Saver system and it keeps for at least a couple months.


These are so adorable— I could see myself getting lost in a project like this and never coming up for air …
Thanks so much Sue! They are definitely fun to make, like playing with play-doh.